![]()
Starting in xv version 3.10, it is now possible to do text annotation, or what we in the business call "putting words on the picture". There is one thing to note, before you go diving in: xv's text annotation ability is Really Lame. I mean, Big Time Lame. It's awkward to use (to say the least), and not very powerful. Frankly, it's an embarrassment. But maybe it'll be useful to someone.
Now that your expectations are suitably low, here's how it works:
| Text Annotation . First, if you have a
selection rectangle drawn, get rid of it. Click this
button to bring up a dialog box, where you can enter a
single-line string. After you enter the string and press <Return
> (or the Ok button in the dialog box), you
will be presented with an appropriately-sized selection
rectangle. You may reposition and resize this rectangle
as you see fit. When you have the rectangle just so,
use the Paste command to put the text on the
image. The text will be pasted in the current color
(See "Displaying
Pixel Values" ). The text will be stretched to
fit the selection rectangle. Keyboard Equivalent: A |
Note: if you want to change the color of the pasted text, pick a new color (via the 'eyedropper' described in "Displaying Pixel Values" ), and issue the Text Annotation command again. (It is not sufficient to simply Paste again.) Note that if you have a selection rectangle drawn, the Text Annotation command will not change the position or shape of the rectangle to reflect the new text, which lets you easily re-Paste over your last attempt.
The Grab command in xv version 3.10 has been extensively improved. It is now possible to do delayed grabs, which can give you time to shuffle some windows around before the grab takes place. You can also do delayed auto-grabs, which gives you a way to grab pull-down menus and other actions that take place while a mouse-button is being held down.
| Grab command. Clicking this
button brings up the xv grab dialog box shown (and
described) below. Keyboard Equivalent: <Ctrl> g |
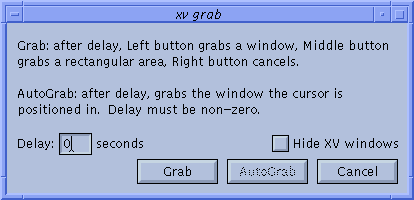
A normal grab operation (issued by hitting the Grab button in the xv grab dialog box) operates as follows:
You can grab the entire contents of a window (including its frame) by clicking the Left mouse button in a window. If you click the Left button somewhere on the root window, the entire screen will be loaded into xv. Note: if you Left- click somewhere inside a window whose contents are drawn in a different visual than the frame (as happens on many 24-bit graphics systems, where the default visual is an 8-bit PseudoColor, but the window contents may be drawn in 24-bit TrueColor), the window frame will not be included in the grabbed image. (It is not possible to grab data from two different visuals simultaneously.)
You can grab an arbitrary region of the screen by clicking the Middle mouse button and dragging a rectangle in exactly the same way you draw a cropping rectangle. When you release the mouse button, the contents of this rectangle will be read from the screen and loaded into xv. Note: the image will be grabbed with respect to the visual of the outermost window that completely encloses the grabbed rectangle. (Practical upshot: on 24-bit systems, if you try to grab the contents of a 24-bit window, plus some of the (8-bit) root window, window frames, etc., you will not get what you probably wanted. Sorry.)
Or, alternately, you can simply abort the Grab command by clicking the Right mouse button anywhere on the screen.
A delayed grab is very similar to a normal grab, except that xv will wait for the specified number of seconds, and then beep once to signify the start of the grab. You can then press the Left, Middle, or Right mouse buttons, as described above. To do a delayed grab, simply enter a non-zero number in the 'Delay' field, and press the Grab button in the xv grab dialog box.
A delayed auto-grab is another matter entirely. When you issue this command (by entering a non-zero number in the 'Delay' field, and pressing the AutoGrab button), xv will sleep for the specified number of seconds, and then automatically grab the full contents of whatever top-level window the mouse is positioned inside of. This makes it possible to grab things like pull-down menus that cannot be captured using the normal grab method. For example, to grab a pull-down menu in another program, set the 'Delay' field to something small (say, '5' seconds), hit the AutoGrab button, go to your other program, and open up the pull-down menu. Continue holding the menu open until xv beeps once (signifying the start of the grab), and then beeps twice (signifying the end of the grab). The entire top-level window containing your menu will be copied into xv. If you get more than you want, you can easily crop off the rest, using the cropping commands. (See "Cropping" )
Note: You may not be able to Grab all of the xv windows, at least not windows owned by the xv doing the grabbing. If you run into this minor inconvenience, simply start a second copy of xv and use it to grab the windows from the first xv (or vice-versa).
You can use the Grab command for a wide variety of purposes. For example, you can use it to print the contents of any window (or the whole screen) by grabbing the appropriate image, and then saving it as a PostScript file.
You can use the Grab command, in conjunction with xv's Zoom and UnZoom commands, as a reasonable, albeit overpowered and none-too-quick, replacement for the xmag program.
You can also use the Grab command to pick 'just the right colors' for any application. Simply start the application in question, Grab the window into xv, and use the xv color editor to twiddle the colors around to your heart's content.
Note: the Grab command does not work on Macintoshes running MacX in a 'rootless' mode, which isn't too surprising, if you think about it...
![]()